Developing Film with Caffenol

Caffenol Is a Great Developer!

For the past couple of years, I’ve been using Caffenol (film developer made with instant coffee) almost exclusively, for my black and white film developing. I have chosen some basic Caffenol recipes from Caffenol.org and through a lot of testing, I have adjusted those recipes to suit my own personal film developing preferences. By understanding how each of the ingredients contributes to the overall film developing effect, I have managed to refine the process and achieve excellent results.

Kodak Tri-X 400, home developed with Caffenol. Widelux F7.

Mixing a batch of Caffenol developer isn’t simply about combining the ingredients; success is dependent on how those ingredients are mixed, as well as developing time, temperatures, and agitation.

Caffenol ingredients. Washing soda, instant coffee and ascorbic acid.

The key to mixing a reliable batch of Caffenol is the same as any scientific exercise; I try to control as many variables as possible. Purity of ingredients, precise timing and temperature. By following these principles, results will be consistent and repeatable.

As a photographer who loves to shoot dance, events and documentary photography, I like to use film in the ISO 400 range, such as Kodak Tri-X 400. It’s a good, versatile film that can easily be pushed a few stops when necessary, like with low light, or mixed lighting situations. When properly exposed and developed, Kodak Tri-X 400 exhibits very good dynamic range, and is useful for a wide range of photographic styles.

Different developers have different effects, depending on their chemistry. The most popular developers, like Kodak HC-110, give Kodak Tri-X 400 decent sharpness and contrast, with good mid tones, depending on the light. Adox Rodinal, also a very popular developer, provides good contrast, but pronounced film grain, and somewhat poor acuity/sharpness. Over the years, Kodak’s HC-110 was my go-to developer, and Adox Rodinal was what we used back in the classroom in my school days.

A couple of years ago, I decided to try Caffenol developer for the first time. To be honest, I wasn’t expecting very much, as many of the examples I’d seen online weren’t exactly stellar, I was seeing under developed, washy, dull or flat looking images. It seemed to me (and probably to many other people) that Caffenol was something you could use to develop film if you were out of other options, and that the mainstream developers were much better. I soon learned that this was not true at all. Caffenol is not only an excellent developer, I believe it is (in my opinion) better than any other black and white developer, as long as it is mixed and used properly.

One of the variables—an important one—is your choice of instant coffee. There are many brands of instant coffee available. You need a brand that has a decent amount of caffeic acid. Caffeic acid is the active ingredient in Caffenol developer. Caffeic acid is a plant-based phenol. Phenols are the active ingredient in most film developers, however, commercial developers use synthetic phenols such as hydroquinone, mainly because they have good storage life, and remain active much longer than the natural, plant-based ones. Most commercial developers contain ingredients that are toxic to the environment, whereas Caffenol ingredients are completely environmentally friendly, and can be dumped down the drain. This is yet another good reason to use Caffenol as your film developer.

So, as I mentioned earlier, your choice of instant coffee is important. I’ve tried several brands, and the most effective kind I’ve tried is Taster’s Choice instant coffee. Just the basic, original Taster’s Choice brand. You may find other brands out there that are effective as well. Just avoid the decaffeinated brands, as they will not work. An interesting observation; the most bitter tasting instant coffee seems to work best. I can only speculate the reason for this—perhaps because the bitter coffee has more caffeic acid in it.

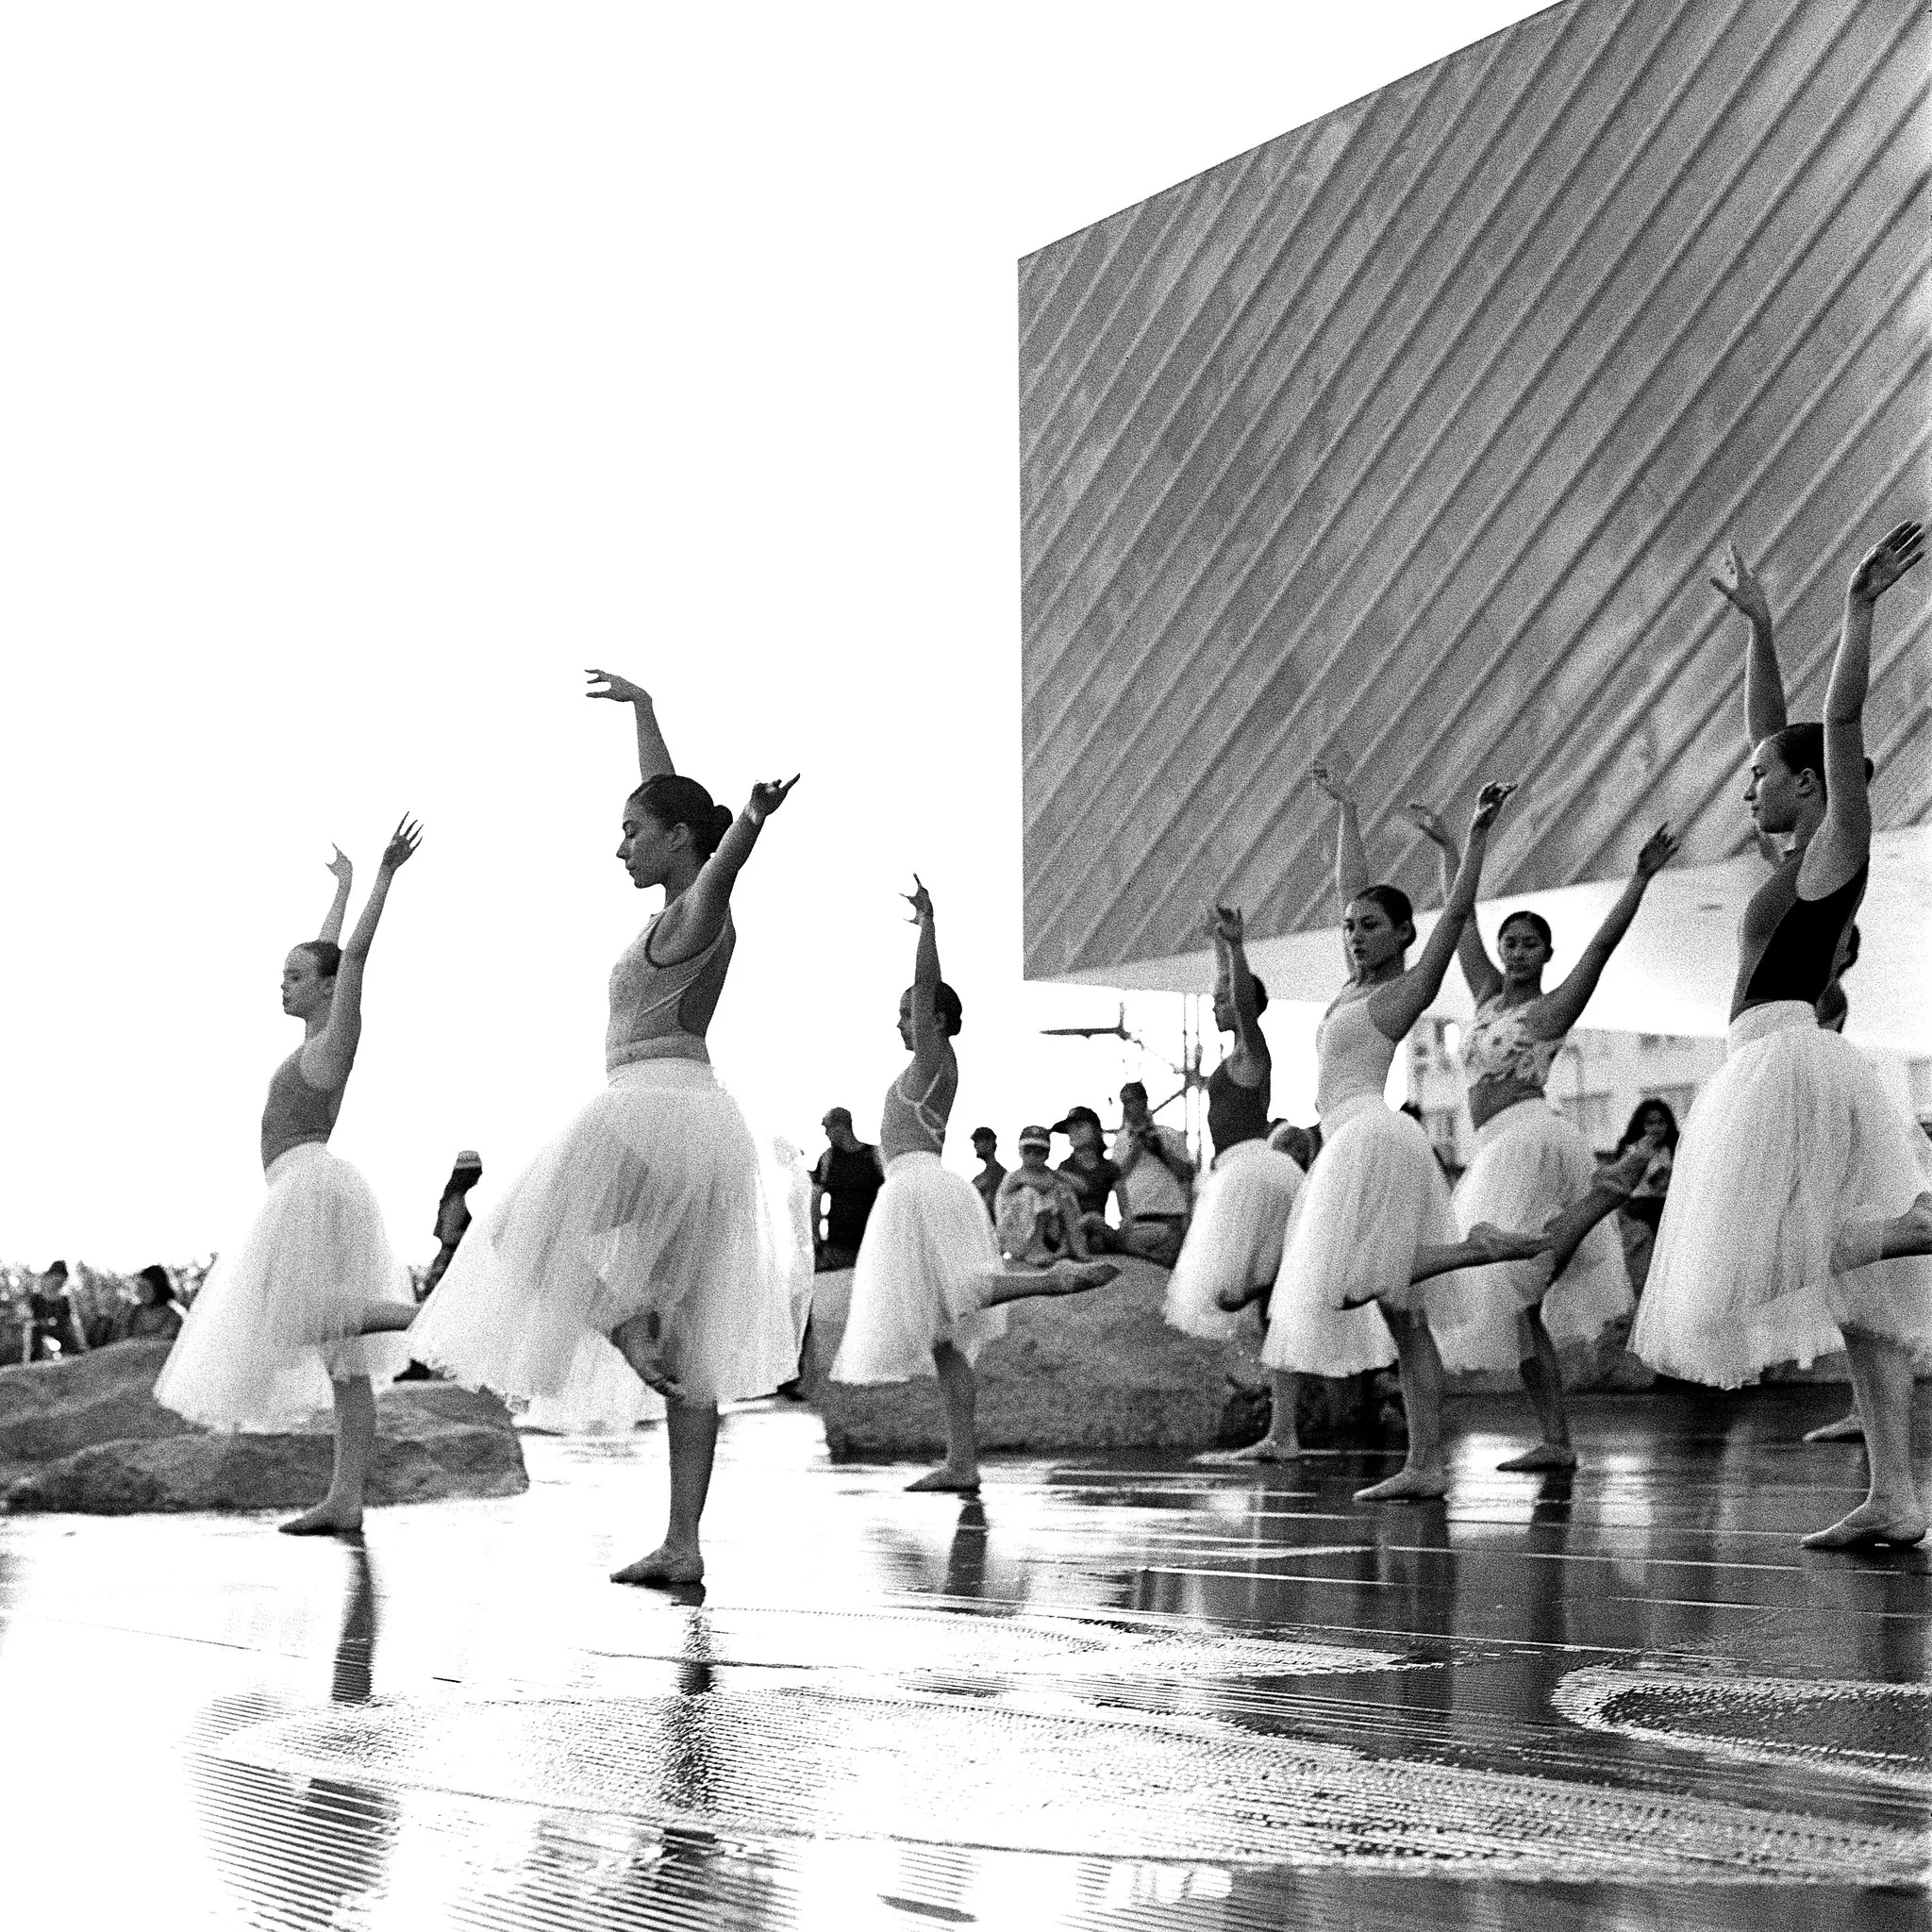
Recently I was asked to shoot a ballet class in a large university dance studio. I decided to shoot the dancers on Kodak Tri-X 400 black and white film, which I would subsequently process with Caffenol. The studio was large, with high ceilings and nice big windows, but the light was quite low, and so I knew I needed to push my film to ISO 1600 in order to bring up my shutter speeds to capture the action.

SFU Woodwards Dance. Hasselblad 205 FCC. Kodak Tri-X 400 pushed to 1600. Developed in Caffenol.

Interestingly, through searching the internet, I could not find examples of, or recipes for Caffenol specifically for push processing film. In fact, all I could find was discussions within photography forums on the topic of pushing film with Caffenol, wherein the general consensus was that you cannot use Caffenol to push process film, due to the limited time in which Caffenol remains active. However, I was not convinced. I knew there had to be some way to make Caffenol more effective for push processing. With some testing and calculations, I was able to produce a recipe and method that works, and is indeed very effective.

SFU Woodwards ballet class. Widelux F7. Ilford HP5 400, pushed to 1600. Developed in Caffenol.

The biggest problem people were facing when experimenting in push processing with Caffenol was the short lifespan of the developer. Oxidization begins immediately once the ingredients are mixed. A fresh batch of Caffenol remains viable for roughly 20-30 minutes, and even less when it reacts with the film. For conventional developers, push processing film 2 stops generally requires approximately 2.5x developing time. It works well, because the active ingredients in the developer remain adequately potent for the extra developing time required for push processing. This is one of the advantages of synthetic phenols over natural, plant based phenols.

So this was my dilemma; How do I extend or sustain the lifespan of my Caffenol developer? Well, I figured it out. I increased the volume of ascorbic acid, and also the volume of the sodium carbonate. The added ascorbic acid would prevent the film from fogging—a less desirable effect of film sitting in Caffenol developer over a long period of time—and additional sodium carbonate would slightly extend the potency of the developer. The other major important change was the frequency of agitations. I needed to agitate the film less frequently.

The normal agitation routine for developing film is to agitate continuously for the first minute, and then about 10 seconds every minute, for the duration of the developing time. I don’t want to go into too much detail here on what exactly is happening chemically during the process of agitation because it would be a very long article, and so I will write a brief explanation; The reason we agitate film is to refresh the chemistry that is reacting with the emulsion layer of the film. When the developer ingredients react with the film, a reaction layer/barrier is formed on the surface of the film. Agitation washes off that reaction layer and enables the process to continue with a fresh layer of developer. More agitation will cause a stronger, more rapid reaction. It is for this reason that I theorized that less agitation would sustain the potency of the Caffenol developer for a longer period. I change the agitation routine from 10 seconds every minute, to 10 seconds every 4 minutes. It worked! The Caffenol developer lasted just long enough to successfully develop film that was pushed two stops! The total developing time was 28 minutes.

SFU Woodwards ballet class. Canon EOS 1nRS. Kodak Tri-X 400 Pushed to 1600. Developed in Caffenol.

Here is the Caffenol recipe, and the method I used with my Kodak Tri-X 400 ISO film, pushed to 1600. This is to make 1 litre of developer:

Ingredients:

40g Tasters Choice instant coffee

40g sodium carbonate

20g ascorbic acid

Equipment:

Digital scale

Digital thermometer

Beakers

Kettle

Use an accurate digital scale to measure the volume of each of the ingredients. Your scale must be sensitive enough to measure volumes in grams. Measure your ingredients into separate beakers, or containers. Important: Do not mix the dry ingredients together!

Empty the instant coffee into 1000ml (or larger) beaker. Add a small amount of boiling water. ( I use about 100ml or so). Stir the coffee until fully dissolved. You can stir the solution with a stirring rod, a spoon, or you can swirl it in the beaker. Just be aware it is boiling hot.

Add some cold water (I add enough cold water to bring the solution up to about half) and then add the sodium carbonate (wash soda). Stir until all of the sodium carbonate is dissolved (approximately 3 minutes). Add the remaining cold water to bring the total volume up to 1000ml, before adding the ascorbic acid.

Check the temperature of the solution. At this point, it should be at the developing temperature of 20 °C. If the solution is hotter than 20 °C, you can add an ice cube until it cools to 20 °C. Be careful not to add too much ice. You don’t want to exceed the solution volume of 1000ml.

Add the ascorbic acid, and stir until fully dissolved. There will be a slight thermogenic reaction when adding the ascorbic acid, and there may be a bit of foaming. This is normal. The fully mixed Caffenol solution is now ready for developing. [Note: The oxidization process of the caffenol begins as soon as you’ve finished mixing your ingredients. You must have your developing tank prepared for developing, as the Caffenol will only be viable for approximately 25-30 minutes after mixing.]

Developing:

[Note: This developing formula/method is intended specifically for developing 400 ISO film that has been pushed to 1600. I have tested this formula with Kodak Tri-X 400 and Ilford HP5 Plus 400 (both pushed to 1600). I have not tested this formula on other films yet. I will be testing other films and recording the results in the near future.]

Set your developing timer for 28 minutes.

Check your Caffenol temperature. It should be 20 °C.

Pour your Caffenol developer into your developing canister. (I use a Paterson multi-reel developing tank which will hold 3 rolls of 35mm film, or 2 rolls of 120/220 film. For this canister, I use the entire 1000ml volume of Caffenol solution. If you have a smaller canister, you can use 500ml of the Caffenol solution, or enough to fill the canister but still allow for agitation.)

Start your developing timer.

Continuous agitation for the first minute, then agitate for 10 seconds every 4 minutes for the rest of the development time.

When the developing is complete, pour out the Caffenol and add your stop bath solution. Alternatively, if you’d rather not use stop bath, you could rinse your film with water instead, which will also stop the development process.

Agitate stop bath solution constantly for 1 minute.

Pour your stop bath solution back into a container (it can be reused several times).

Pour your fixer solution into the developing canister. Continuous agitation for the first minute, then agitate for 10 seconds every minute, for a total of 5 minutes. I use Ilford Rapid Fixer for my fixing solution. When fixing is finished, pour it into a container (it can be reused several times).

Rinse your film for several minutes (I rinse for about 3 minutes) with running water.

Use a wetting agent to prevent water spots on your film. I use Ilford Ilfotol wetting agent for 1 minute after rinsing the film. Hang your film to dry for at least 8 hours before handling.

Notes:

-Caffenol is intended as one-shot developer, and should not be reused. When finished developing, it is safe to discard the Caffenol down the sink.

-Normal caffenol developing time is 11:00 for Kodak Tri-X 400 (pushed 2 stops) x 2.5 = 27.5 minutes. I rounded the development time to 28 minutes.

-I added an additional 5g of sodium carbonate. (The standard is 35g.) I decreased agitation from 10 seconds every minute to 10 seconds every 4 minutes.


Be sure to check out Caffenol.org. It is a vast wealth of info on everything Caffenol related.

Lomography Earl Grey 100 Black and White Film

This past summer, I was shooting photos for Small Stage and their #LoveBubble Project. Small Stage features live dancing, music and fun interactions with the public. This is exactly the kind of action I love shooting.

When I was shooting the events that day, the light conditions varied from high contrast bright afternoon sun, to soft, slightly overcast diffused light. I thought it would be a perfect opportunity to try out the Lomography Earl Grey ISO 100 black and white 35mm film, and put it’s capabilities to the test.

From Lomography’s website:

This film produces deep blacks, bright whites and soft shades of grey even under low-light conditions.

When I developed the film and saw the results, I was so impressed! This film has so much range, especially in the mid-tones. It is perfectly versatile for shooting in changing light conditions. It’s got a nice, wide exposure latitude, showing plenty of details in the shadows, and in the highlights, and indeed, it’s got rich looking blacks. There is some noticeable grain, but it’s not unpleasant, it’s quite soft, small and uniform. It reminds me of an older, classic black and white film, but with decent sharpness. Thank you Lomography for producing yet another exceptional black and white film! I’m looking forward to shooting more, and also trying the 120 version of this film.

Lomography Earl Grey ISO 100 film comes in 35mm and 120 formats.

Here are some photos from my recent roll of Lomography Earl Grey 100 35mm film.

Small Stage dancers. The #LoveBubble Project. Lomography Earl Grey 100 black and white film. Canon EOS1 SLR. Developed with Kodak HC-110 (1+31).

Small Stage dancers. The #LoveBubble Project. Lomography Earl Grey 100 black and white film. Canon EOS1 SLR. Developed with Kodak HC-110 (1+31).

Small Stage dancers. The #LoveBubble Project. Lomography Earl Grey 100 black and white film. Canon EOS1 SLR. Developed with Kodak HC-110 (1+31).

Small Stage dancers. The #LoveBubble Project. Lomography Earl Grey 100 black and white film. Canon EOS1 SLR. Developed with Kodak HC-110 (1+31).

Small Stage dancers. The #LoveBubble Project. Lomography Earl Grey 100 black and white film. Canon EOS1 SLR. Developed with Kodak HC-110 (1+31).

Small Stage dancers. The #LoveBubble Project. Lomography Earl Grey 100 black and white film. Canon EOS1 SLR. Developed with Kodak HC-110 (1+31).

Small Stage dancers. The #LoveBubble Project. Lomography Earl Grey 100 black and white film. Canon EOS1 SLR. Developed with Kodak HC-110 (1+31).

Small Stage dancers. The #LoveBubble Project. Lomography Earl Grey 100 black and white film. Canon EOS1 SLR. Developed with Kodak HC-110 (1+31).

And one more photo that I shot that same evening:

Boy with fishing rod at Lonsdale Quay in North Vancouver. Lomography Earl Grey 100 black and white film. Canon EOS1 SLR. Developed with Kodak HC-110 (1+31).

Boy with fishing rod at Lonsdale Quay in North Vancouver. Lomography Earl Grey 100 black and white film. Canon EOS1 SLR. Developed with Kodak HC-110 (1+31).

All of these photos were shot with my Canon EOS1 SLR and home developed with Kodak HC-110 (1+31) developer. Epson V-850 Scan.

Vibrant Golden Apples on Film

Recently, I was going through some old boxes from my storage room, and I found a bunch of old film negatives. I’d forgotten about these photos that I shot sometime in the early nineties, but as soon as I saw them again, the memory of that moment came back to me.

It was during one of my visits to my parents place in Penticton, probably some time in December. I’d decided to take a drive out to Summerland, where I grew up. It was a very cold and grey, dull kind of afternoon and I was driving my car along a scenic backroad where there was a lot of orchards. I remember feeling rather melancholy because I was there all by myself. Most of the friends I grew up with had moved away.

While I was driving, suddenly, amongst the dull, frozen grey of everything, I spotted this bright, vibrant golden apple, still clinging to the bare tree! And then I spotted more of them! I immediately pulled the car over to the side of the road and parked. I pulled my camera out of the trunk. I think it was my old Canon EF back then, but I can’t remember for sure. Luckily I had colour film loaded in the camera, and I shot a bunch of photos of the beautiful, frozen apples. As I was composing the shots, I remember hoping that the film would pick up this same wonderful vibrance that I was seeing with my own eyes. Finding those apples completely made my day.

When I had the film processed, I remember looking at the prints and thinking that the yellow-gold colour of the apples was relatively vibrant, but not quite how I’d hoped. It wasn’t a limitation of the film, it was the print. Most film processing shops back then would use auto colour/levels balancing resulting in somewhat homogenized looking prints. I didn’t have a darkroom back then, so I would usually get my prints from these common film labs. If I wanted something better, I had to get enlargements from the reputable labs that specialized in professional quality prints.

Today, nearly thirty years later, I’m so happy to have the technology to scan and finally display this photo exactly how I’d intended it to be seen, with all of it’s wonderful vibrance. For the record, these are straight scans, with no adjustments in photoshop. The Fuji Reala film all those years ago, truly did record the beautiful colours accurately, and the film hasn't faded at all.

Frozen golden apple. Summerland, BC.

Frozen golden apple. Summerland, BC.

Frozen Golden Apples. Summerland, BC.

Frozen Golden Apples. Summerland, BC.

Apple orchard in winter. Summerland, BC.

Apple orchard in winter. Summerland, BC.

Ilford Ilfocolor Retro 400 Film

Recently, I purchased a few Ilford Ilfocolor Rapid Retro disposable cameras from Rocket Repro in the Gastown district of Vancouver. I’ll admit, the fun, sporty looking retro 1980’s packaging was the first thing that caught my eye, but mostly I was intrigued with the idea of Ilford colour film. To be honest I didn’t even know Ilford ever made colour film. After some research, I learned that Ilford did indeed make colour film called Ilfocolor, for a period in the 1960’s. Ilford also made a more popular reversal film, called Ilfochrome. Ilford’s final production of Ilfochrome was in 2012. You can read about the history of these films here.

Interestingly, this new film contained within the Ilford Ilfocolor Rapid Retro disposable cameras is not slide (reversal film), it is 27-exposure ISO 400 colour negative film. I can’t find any information from Ilford’s websites revealing exactly what this film is. Is its emulsion based on the original formula from the 1960’s? I would love to find out more.

If you look at the technical specifications of the new Ilfocolor Rapid Retro disposable cameras, you will notice that they are similar to most other disposable cameras.

  • Optical Lens: 31 mm – F=11, 1 element

  • Focusing: Focus Free – 1m – ∞

  • Shutter Speed: Shutter 1/125s

I could, of course, shoot with one of these cameras as-is, but I love to experiment, and so I decided to remove the unexposed roll from the Ifocolor Retro camera and loaded it into one of my 35mm film SLRs, in this case, my Canon EOS 1 SLR. This would allow me complete control over my exposure settings, and would enable me to perform a more accurate test of this mystery film’s capabilities, without the limitations of the fixed settings of the disposable camera.

Removing the film from the Ilfocolor Retro disposable camera was quite simple. Like most disposable cameras, the manufacturer loads the film unwound. If you try this yourself, it is very important that you know this, because if you open your camera without advancing the whole roll back into the canister first, you will expose all of the film, and render it useless. So you MUST advance the film into the canister first. To do this, you can simply cover the lens with your finger and shoot every frame until there is no longer any resistance when you wind it, or usually after the 27th frame in the case of this particular camera. I recommend doing this in the dark, or in a dark bag (changing bag) as to ensure no light is getting past whatever you’re covering the lens with. When you reach the end, all of your film is wound back into its canister.

To open the Ilfocolor Rapid Retro disposable camera, you need to locate all of the plastic tabs and open them. Most of them are hidden under the paper decals on the camera body. You can peel off the paper to find them. I used a small screwdriver to depress the plastic tabs and open the camera. If you have no intention of reusing your disposable camera, you can easily force the camera open. Just be aware that some little bits will probably go flying around in every direction if you do this. There is also a AAA battery in the bottom of the camera, which you can reuse for other purposes.

I used a film retriever to pull the film leader back out of the canister, so that I could load it into my EOS 1 SLR.

After I loaded the Ilfocolor Retro film into my camera, I checked the ISO setting to ensure it was set to ISO 400.

I took advantage of a nice, sunny weekend, and shot some colourful events with this film, and I am very impressed with the results!

This film seems capable of reproducing a nice, broad colour palette, with bold, solid reds and yellows. I find it difficult to compare this film with any of the Kodak or Fuji range of colour negative films, as its look is quite unique. It may possibly be similar to some Agfa films I’ve seen, such as Agfa Vista, but Vista 200 has a distinct earthy tone to its reds and greens. This film also exhibits some decent, noticeable film grain. Not too much, just the right amount of film grain for my taste.

The Ilfocolor Retro 400 film certainly has a retro look to it, with the slightly simplified, bold colours, and film grain, but it doesn't remind me of 60’s era film, it reminds me more of 80’s era film.

As far as dynamic range, this film seems quite good. It is capable of maintaining details in the highlights, even with bright white fabrics, and the shadow details are good too, in the shade. Overall, this seems to be relatively high contrast film, but in all fairness, I shot most of the roll in bright sunshine. I shall experiment further with more lighting conditions when I shoot my next roll.

Here are some examples of my results with the Ilofocolor 400 Retro Film:

Sam Chimes performing at the Small Stage Love Bubble Project. August 28th 2021 Granville Promenade. Ilford Ilfocolor Retro 400 35mm film. Canon EOS 1.

Sam Chimes performing at the Small Stage Love Bubble Project. August 28th 2021 Granville Promenade. Ilford Ilfocolor Retro 400 35mm film. Canon EOS 1.

A first nations man performs an indigenous dance at the Granville Promenade. August 28th 2021. Ilford Ilfocolor Retro 400 35mm film. Canon EOS 1.

A first nations man performs an indigenous dance at the Granville Promenade. August 28th 2021. Ilford Ilfocolor Retro 400 35mm film. Canon EOS 1.

A first nations woman performs an indigenous dance at the Granville Promenade, August 28th 2021. Ilford Ilfocolor Retro 400 35mm film. Canon EOS 1.

A first nations woman performs an indigenous dance at the Granville Promenade, August 28th 2021. Ilford Ilfocolor Retro 400 35mm film. Canon EOS 1.

A first nations man performs an indigenous dance at the Granville Promenade. August 28th 2021. Ilford Ilfocolor Retro 400 35mm film. Canon EOS 1.

A first nations man performs an indigenous dance at the Granville Promenade. August 28th 2021. Ilford Ilfocolor Retro 400 35mm film. Canon EOS 1.

Sam Chimes performing at the Small Stage Love Bubble Project. August 28th 2021 Granville Promenade. Ilford Ilfocolor Retro 400 35mm film. Canon EOS 1.

Sam Chimes performing at the Small Stage Love Bubble Project. August 28th 2021 Granville Promenade. Ilford Ilfocolor Retro 400 35mm film. Canon EOS 1.

Sam Chimes performing at the Small Stage Love Bubble Project. August 28th 2021 Granville Promenade. Ilford Ilfocolor Retro 400 35mm film. Canon EOS 1.

Sam Chimes performing at the Small Stage Love Bubble Project. August 28th 2021 Granville Promenade. Ilford Ilfocolor Retro 400 35mm film. Canon EOS 1.

A family enjoying a nice summer evening at the MegaBench in North Vancouver.

A family enjoying a nice summer evening at the MegaBench in North Vancouver.

I developed these photos with Cinestill CS41 C-41 Film developer, and scanned the negatives with the Epson V-850. You can view these photos, and my other photos in their full resolution on my Flickr page. Please feel free to comment.

In conclusion, I really like this film, and I will certainly shoot with it again. At this point, I wish to shout out to Ilford and thank them for creating this new and fun camera. I do hope that Ilford will release the Ilfocolor Retro 400 roll film on its own too, so that people like myself won’t need to cannibalize the disposable cameras to use the film in our SLRs. As it stands, the price for an Ilford Ilfocolor Rapid Retro disposable camera costs about the same as a good quality roll of Kodak professional film. If Ilford does decide to sell the Ilfocolor Retro 400 film separately, I’m sure it would be less expensive.

Thank you for visiting, and be sure to check out my Instagram page, and my Lomography page, too!

Classic Chevy with Hula Girl

In my previous post, I did a review on the amazing qualities of Bergger Pancro 400 film.

There was another image from that last roll which I wanted to include. I’ll post it here.

Near my Sweetie’s old art studio there is a lot with some cars that are in various stages of repair and restoration. There’s one car in particular that I just love. It’s an old Chevy that’s slowly being restored. It’s a beautiful big old car, with so much character. The most charming thing about it is how someone left the interior as is when they brought this car in. There’s an old Mexican blanket on the seat, and other little articles reminiscent of a car that was well loved. When I look in the car windows, I get a nice, warm vibe, and I imagine the pleasant memories the owners of this car must have had.

My favourite thing about this car, is the little hula girl ornament on the dashboard.

I decided to shoot this from the outside in, with some outside reflections on the glass, and the focus on the hula girl in the centre of the dashboard. I shot this car from several angles, and I’m very happy with the way this photo turned out.

Bergger Pancro 400 120 film, pulled to EI 100. Home developed with HC-110 (1+31) 7:17 at 19.5°C. Shot with my Hasselblad 205fcc and Zeiss Planar T* 80mm f/2.8. 1/500th at f/8.0.

Bergger Pancro 400 120 film, pulled to EI 100. Home developed with HC-110 (1+31) 7:17 at 19.5°C. Shot with my Hasselblad 205fcc and Zeiss Planar T* 80mm f/2.8. 1/500th at f/8.0.

I’m currently shooting another roll of Bergger Pancro 400 film in my Hasselblad. This time I’ve pushed the film to EI 800 (exposure index). I think it will work well being pushed, and should have slightly greater contrast than it exhibits when shot at box speed. I’m excited to see the results.

Here are some older photos of that same car, but shot with Kodak Tri-X 400.

Vivitar XV-1 SLR on Kodak Tri-X 400 35mm film, pushed to 1600. Home developed in Kodak HC-110. 7.07 minutes at 30°C. Epson V-850 Scan.

Vivitar XV-1 SLR on Kodak Tri-X 400 35mm film, pushed to 1600. Home developed in Kodak HC-110. 7.07 minutes at 30°C. Epson V-850 Scan.

Vivitar XV-1 SLR on Kodak Tri-X 400 35mm film, pushed to 1600. Home developed in Kodak HC-110. 7.07 minutes at 30°C. Epson V-850 Scan.

Vivitar XV-1 SLR on Kodak Tri-X 400 35mm film, pushed to 1600. Home developed in Kodak HC-110. 7.07 minutes at 30°C. Epson V-850 Scan.

Vivitar XV-1 SLR on Kodak Tri-X 400 35mm film, pushed to 1600. Home developed in Kodak HC-110. 7.07 minutes at 30°C. Epson V-850 Scan.

Vivitar XV-1 SLR on Kodak Tri-X 400 35mm film, pushed to 1600. Home developed in Kodak HC-110. 7.07 minutes at 30°C. Epson V-850 Scan.

Bergger Pancro 400 Film

A little while ago, I was in Kerrisdale Cameras stocking up on some film, when I noticed a brand that I hadn’t seen before—Berger Pancro 400 black and white film. I’m always keen to try new film, and so I bought a couple of rolls in the 120 format (also available in 135).

When I got home, I did some research about the Bergger company, and WOW! They are a very well established company, with a wide variety of photography products available, including film, film paper and even developing chemistry.

Bergger is the heiress of the much older film company Guillemot, the last French firm that specializes in making photosensitive surfaces.

Of course, one of the very first things I did was search for image examples of the film I had just purchased, and I was immediately blown away by the quality and uniqueness of this film! I’d have sworn I was looking at film with an emulsion base of platinum or gold. The examples I found were exquisite to say the least.

From their website:

BERGGER Pancro 400 is a two emulsion film, composed with silver bromide and silver iodide. They differ by the size of their grain. These properties allow a wide exposure latitude.  Cristals are precipitated by double-jet process, under the control of a computer. The two emulsions are panchromatic, and are stabilized by high tech systems.

BERGGER Pancro400 in 120 is coated on a 100 microns PET base and includes an anti curling layer. It is designed with an undercoated anti-halation layer which clarifies during processing, and a anti-curling layer.

I loaded my first roll of Bergger Pancro 400 120 film into Apollo, my lovely old Hasselblad 500c, and I shot some photos around The Shipyards District in North Vancouver. Because this was the first roll, I shot it at box speed, ISO 400, so I would get a true sense of the nature of this film.

I developed the first roll with Kodak HC-110 (1+31) 6:30 minutes at **24°C.

Lovely Joanne at the Shipyards pier with her Leica R5 SLR. Bergger Pancro 400 120 film. Hasselblad 500c. 1/500th f/8.0. Zeiss Planar T* 80mm f/2.8. Developed with HC-110 (1+31) 6:30 24°C. Epson V-850 scan.

Lovely Joanne at the Shipyards pier with her Leica R5 SLR. Bergger Pancro 400 120 film. Hasselblad 500c. 1/500th f/8.0. Zeiss Planar T* 80mm f/2.8. Developed with HC-110 (1+31) 6:30 24°C. Epson V-850 scan.

Notice the incredible midrange details, and the beautiful, fine grain. Bergger Pancro has an amazing dynamic range. With most film, a photo like this would have very strong contrast, because Joanne is standing in direct sunlight, yet there is so much lovely detail in the shadows. The highlights are not blown out at all. There is a perfect balance.

An artist painting a scene at the Shipyards pier in North Vancouver. Bergger Pancro 400 120 film. Hasselblad 500c. 1/500th f/8.0. Zeiss Planar T* 80mm f/2.8. Developed with HC-110 (1+31) 6:30 24°C. Epson V-850 scan.

An artist painting a scene at the Shipyards pier in North Vancouver. Bergger Pancro 400 120 film. Hasselblad 500c. 1/500th f/8.0. Zeiss Planar T* 80mm f/2.8. Developed with HC-110 (1+31) 6:30 24°C. Epson V-850 scan.

As you can see, even though this film reveals so much detail in the midrange, it does not lack good contrast at all. It’s rare to see a film that can render both so well.

A man in The Polygon Gallery, with outside scene reflecting on the glass. Bergger Pancro 400 120 film. Hasselblad 500c. 1/125th f/5.6. Zeiss Planar T* 80mm f/2.8. Developed with HC-110 (1+31) 6:30 24°C. Epson V-850 scan.

A man in The Polygon Gallery, with outside scene reflecting on the glass. Bergger Pancro 400 120 film. Hasselblad 500c. 1/125th f/5.6. Zeiss Planar T* 80mm f/2.8. Developed with HC-110 (1+31) 6:30 24°C. Epson V-850 scan.

So, after shooting the first roll and discovering just how wonderful this film is, I wanted to see how it handles being pulled a couple of stops. Pull processing a film simply means you are metering for a lower exposure index than the normal box speed ISO sensitivity of the film, and then adjusting your development time accordingly. So for example, if your film’s box speed is ISO 400, you can pull it 2 stops to EI (Exposure Index) 100 by adjusting your camera metering to the exposure settings as if you were shooting ISO 100 film. You are purposely overexposing your film, and then under-developing it. The main reason for pulling film is to decrease contrast, and to give you more details in the shadows. (Note that this is the opposite effect of pushing film.) This is especially useful on bright sunny days with harsh shadows.

So, I loaded my second roll of Bergger Pancro 400 film, into Legend, my Hasselblad 205fcc, and set it at ISO 100. I developed using HC-110 (1+31) 7:17 at 19.5°C. Here are the results:

Joanne with one of her Polaroid cameras at The Polygon Gallery in North Vancouver. Bergger Pancro 400 120, pulled to EI 100. HC-110 (1+31) 7:17 at 19.5°C. Hasselblad 205fcc. Zeiss Planar T* 80mm f/2.8. 1/500th at f/8.0. Epson V-850 scan.

Joanne with one of her Polaroid cameras at The Polygon Gallery in North Vancouver. Bergger Pancro 400 120, pulled to EI 100. HC-110 (1+31) 7:17 at 19.5°C. Hasselblad 205fcc. Zeiss Planar T* 80mm f/2.8. 1/500th at f/8.0. Epson V-850 scan.

The Bergger Pancro 400 performed wonderfully when pulled to EI 100. You can see in these photos of Joanne that there is a lot of fine detail in all of the shadows, and the highlights are not blown out, even though these photos were shot in direct sunlight.

Joanne with one of her Polaroid cameras at The Polygon Gallery in North Vancouver. Bergger Pancro 400 120, pulled to EI 100. HC-110 (1+31) 7:17 at 19.5°C. Hasselblad 205fcc. Zeiss Planar T* 80mm f/2.8. 1/500th at f/8.0. Epson V-850 scan.

Joanne with one of her Polaroid cameras at The Polygon Gallery in North Vancouver. Bergger Pancro 400 120, pulled to EI 100. HC-110 (1+31) 7:17 at 19.5°C. Hasselblad 205fcc. Zeiss Planar T* 80mm f/2.8. 1/500th at f/8.0. Epson V-850 scan.

In conclusion, it’s very clear that Bergger Pancro 400 is an exceptional film, with excellent dynamic range, and it yields beautiful images with fine, pleasing grain. I will certainly be shooting more of this film, and I highly recommend it. I may try some push processing on the next roll.

**My development temperatures sometimes vary from the standard 20°C, in which I adjust my development time accordingly. I may increase the developer temperature occasionally to speed up the development time, especially with push processing, as the development time can be very long. In some cases my developing temperature is less than the standard, simply to align with the actual room temperature. There are a lot of variables to maintain and control while developing film. I do not recommend this unless you are well experienced with the developing processes.

Dance on the Street

I love shooting dance. All kinds of dance, especially ballet.

Last weekend, I had the privilege of shooting a pop-up performance by Ballet Bloch Canada, at The Polygon Gallery’s outside water feature, in North Vancouver. These were young dancers, probably between 12 - 16 years old, and they were amazing! Their show was called “On the Water”, based on Swan Lake, with some lovely classical music.

I shot with my Hasselblad 500c, Canon EOS 1, and Canon 5Dmk III. Lighting was tricky, because it was around 5:30 pm when they were performing, and there were strong shadows from the gallery, with bright, high-contrast light from the sun, and the dancers were moving in, and out of the light. I shot with Kodak Tri-X 400 film in the Hasselblad, pushed to EI 800, which worked quite nicely, because of the huge exposure latitude with that film. I developed that film at home the same night, and scanned it the next day.

Here are some photos from On the Water, featuring Ballet Bloch Canada:

Ballet dancers. Hasselblad 500c, Kodak Tri-X 400 120 film pushed to EI 800. Developed in Blazinal (Rodinal) 1+25 5:53 at 25°C. Epson V-850 scan.

Ballet dancers. Hasselblad 500c, Kodak Tri-X 400 120 film pushed to EI 800. Developed in Blazinal (Rodinal) 1+25 5:53 at 25°C. Epson V-850 scan.

Ballet dancers. Hasselblad 500c, Kodak Tri-X 400 120 film pushed to EI 800. Developed in Blazinal (Rodinal) 1+25 5:53 at 25°C. Epson V-850 scan.

Ballet dancers. Hasselblad 500c, Kodak Tri-X 400 120 film pushed to EI 800. Developed in Blazinal (Rodinal) 1+25 5:53 at 25°C. Epson V-850 scan.

Ballet dancers. Hasselblad 500c, Kodak Tri-X 400 120 film pushed to EI 800. Developed in Blazinal (Rodinal) 1+25 5:53 at 25°C. Epson V-850 scan.

Ballet dancers. Hasselblad 500c, Kodak Tri-X 400 120 film pushed to EI 800. Developed in Blazinal (Rodinal) 1+25 5:53 at 25°C. Epson V-850 scan.

Ballet dancers. Hasselblad 500c, Kodak Tri-X 400 120 film pushed to EI 800. Developed in Blazinal (Rodinal) 1+25 5:53 at 25°C. Epson V-850 scan.

Ballet dancers. Hasselblad 500c, Kodak Tri-X 400 120 film pushed to EI 800. Developed in Blazinal (Rodinal) 1+25 5:53 at 25°C. Epson V-850 scan.

Ballet dancers. Canon 5Dmk III.

Ballet dancers. Canon 5Dmk III.

Ballet dancers. Canon 5Dmk III.

Ballet dancers. Canon 5Dmk III.

Ballet dancers. Canon 5Dmk III.

Ballet dancers. Canon 5Dmk III.

See my related posts on my Instagram page : https://www.instagram.com/markklotz/

See the original photos on Flickr: https://www.flickr.com/photos/markklotz/

The Hasselblad

I’ve wanted a Hasselblad for as long as I can remember. I’ve shot photos with so many different kinds of cameras, but there’s nothing quite like the Hasselblad—It’s a classic, with an incredible history, and reputation. For medium format photography, it simply can’t be beat, especially with those Carl Zeiss lenses.

Well, as luck would have it, back in November, I came across a local ad online for a Hasselblad 500c. The price was very reasonable, and so I went for it. I made arrangements to meet up with the fellow who was selling it, just outside of the Commercial Skytrain station. I’d paid him in advance, something I don’t normally do, but I needed to secure this camera before someone else got their hands on it. It was the right thing to do, because from the moment he placed the ad, at least eight people showed interest.

So I met him in his van, just off Commercial Ave in Vancouver, and he gave me the camera. He also threw in a nice roll of expired Fujichrome Provia 100F Professional RDP-III 120 film, which was the first roll of film I loaded into the Hasselblad.

It has taken some practice getting used to using the Hasselblad 500c, but I absolutely love it. If you want to use a Hasselblad for street photography, you need to work extra hard. Finding your subject, and then focusing just in time, is no simple task, but it’s very rewarding when it’s done right. This particular model, the 500c, has a waist-level finder, which I think is perfect for street photography. It allows you to remain virtually unnoticed while you focus on your subject, because your camera is at your waist—unassuming, and nonthreatening, from your subject’s perspective. It is, of course, a lot easier using an eye level finder (optional for all Hasselblads, including mine) but again, getting a sneaky candid shot can be more difficult when you’re holding a very large camera up to your face.

Hasselblad 500c with Zeiss Planar 80mm f/2.8 lens, at f/11 1/500. Kodak Tri-X 400 film, pushed to 1600. Home developed in Joanne’s Kitchen Sink.

Hasselblad 500c with Zeiss Planar 80mm f/2.8 lens, at f/11 1/500. Kodak Tri-X 400 film, pushed to 1600. Home developed in Joanne’s Kitchen Sink.

As soon as I got my beautiful new Hasselblad home, I couldn’t wait to show it off to my Honey Bunny Joanne. We give most of our cameras their own special names, and for this Hasselblad, Joanne came up with the name Apollo. A perfect choice for this camera, because this was the model used by the NASA Apollo 8 Lunar mission where they shot those incredible photos from the moon!

I shot some portraits of Joanne, too. She’s not only a great artist and photographer, she’s also a lovely model!

Joanne, beside the Polygon Gallery in North Vancouver. Shot with my Hasselblad 500C (Apollo), on Rollei RPX 400 black and white film, pushed to EI 1600. Developed in Joanne’s kitchen sink.

Joanne, beside the Polygon Gallery in North Vancouver. Shot with my Hasselblad 500C (Apollo), on Rollei RPX 400 black and white film, pushed to EI 1600. Developed in Joanne’s kitchen sink.

Joanne on Lonsdale, in North Vancouver. Shot with my Hasselblad 500C (Apollo), on Rollei RPX 400 black and white film, pushed to EI 1600. Developed in Joanne’s kitchen sink.

Joanne on Lonsdale, in North Vancouver. Shot with my Hasselblad 500C (Apollo), on Rollei RPX 400 black and white film, pushed to EI 1600. Developed in Joanne’s kitchen sink.

Lovely Joanne. Shot with my Hasselblad 500c with Foma Holga 400 Black and White Negative Film. Pushed to EI 1600. Developed in Joanne's kitchen sink.

Lovely Joanne. Shot with my Hasselblad 500c with Foma Holga 400 Black and White Negative Film. Pushed to EI 1600. Developed in Joanne's kitchen sink.

I’m looking forward to shooting some upcoming events with Apollo. Stay tuned!

Hot One Inch Action Button Art Show

My Lovely Joanne and I went to the Hot One Inch Action button art show, a few weeks back on October 20th. What a great time! Such a fun event! Thank you, Hot Art Wet City!

I shot these photos with my cool little Lomography Simple Use Film Camera, loaded with Lomo Lady Grey 400 black and white film, home developed with Kodak HC110(b) 5:30 minutes, in Joanne’s kitchen sink.

BUtton Party 4 fluff.jpg
Button Show 2.jpg
30932477827_bd81c46c73_k.jpg
32000206588_935c69c823_k.jpg
44958021765_f5a0c0473f_k.jpg
45821635162_aa1dad4648_k.jpg
45871047811_ee927c91eb_k.jpg
45821580482_65606214cf_k.jpg
30931772567_854d927ce6_k.jpg
45146542954_a12a784f6b_k.jpg
44054079240_f8f8ff9356_k.jpg